Thursday, November 21, 2024

How to Build a Lean-To Shed: Create a Simple and Reliable Shed

How to Build a Lean-To Shed: Create a Simple and Reliable Shed

Building Your Own Lean-To Shed: A Simple Guide

So, you're thinking about building a lean-to shed? Fantastic! It's a surprisingly achievable project, even for a DIY novice. A lean-to offers a great way to add extra storage or workshop space without breaking the bank or requiring advanced carpentry skills. This guide will walk you through the process, step-by-step, in a way that's easy to understand, even if you've never picked up a hammer before.

Planning Your Lean-To Shed: Laying the Foundation

Before you even think about grabbing your tools, some planning is crucial. This will save you headaches (and potentially materials) down the line.

1. Choosing the Right Location:

Where will your lean-to live? Consider these factors:

  • Proximity to your house: Lean-tos are often attached to existing structures, making this a major factor. Ensure you have enough space and access to the area you've chosen.
  • Sunlight and shade: Will your shed need protection from the elements? Think about how much sun exposure it will receive and how that might affect items stored inside.
  • Ground conditions: Is the ground level and stable? You might need to level the ground before you begin building. A slightly sloped area can work, as long as you adjust your foundation accordingly.
  • Access to utilities: If you're planning on using electricity, water or even just easy access for moving things in and out, consider how close the lean-to is to the main power, water sources etc.

2. Determining the Size and Dimensions:

How much space do you need? Measure carefully! Think about what you'll be storing in your shed. A larger shed is nice, but it also means more materials and labor. A smaller shed might suffice if all you need is extra storage space.

3. Gathering Your Materials:

This is where a detailed list really pays off. You'll need:

  • Pressure-treated lumber: For the frame, this is crucial for longevity and rot resistance.
  • Plywood or OSB sheeting: For the walls and roof.
  • Roofing material: Asphalt shingles are a popular and relatively inexpensive option.
  • Concrete blocks or a suitable foundation: Depending on the ground conditions and local building codes, your foundation may need to be more robust than just a few blocks.
  • Nails, screws, and other fasteners:
  • Measuring tape, level, saw, hammer, drill, etc.: Make sure you have the necessary tools for the job.
  • Optional: Window(s), door(s), paint, sealant.

It's always a good idea to buy slightly more materials than you think you'll need. This accounts for mistakes and potential waste.

Construction: Building Your Lean-To Shed

With your plan in place and your materials gathered, let's get building! Remember safety first â€" always wear appropriate safety glasses and gloves.

1. Preparing the Foundation:

Start by clearing and levelling the ground where your shed will sit. This is incredibly important for the stability of your structure. For a simple lean-to, a few concrete blocks might suffice, but you might want to check local building codes for more complicated foundations. Properly leveling your foundation blocks is crucial for a level shed, preventing structural problems later on.

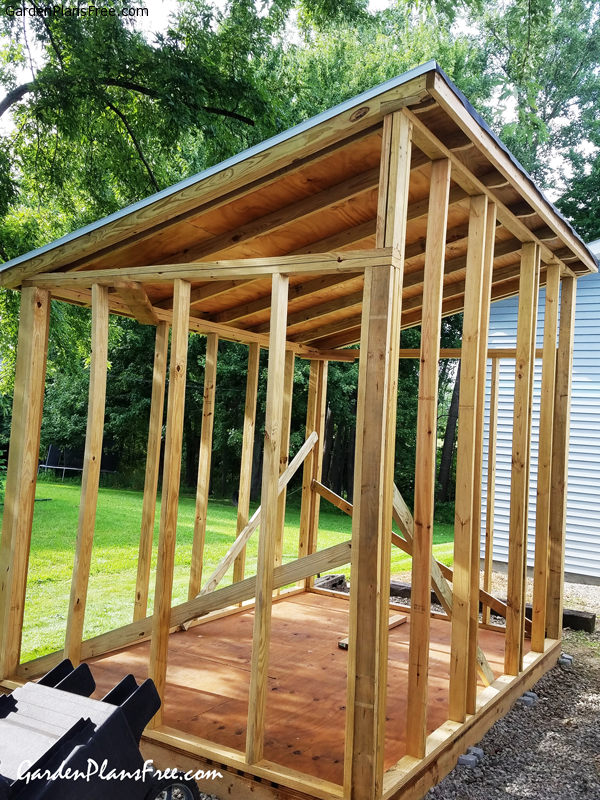
2. Building the Frame:

This involves constructing the walls and roof support structure. Your measurements from the planning stage will be crucial here. You'll likely want to build the frame on the ground, and then lift it into place to avoid awkward assembly at height. Start with the base frame and then add the vertical supports. Remember to use a level constantly to ensure everything is square and plumb.

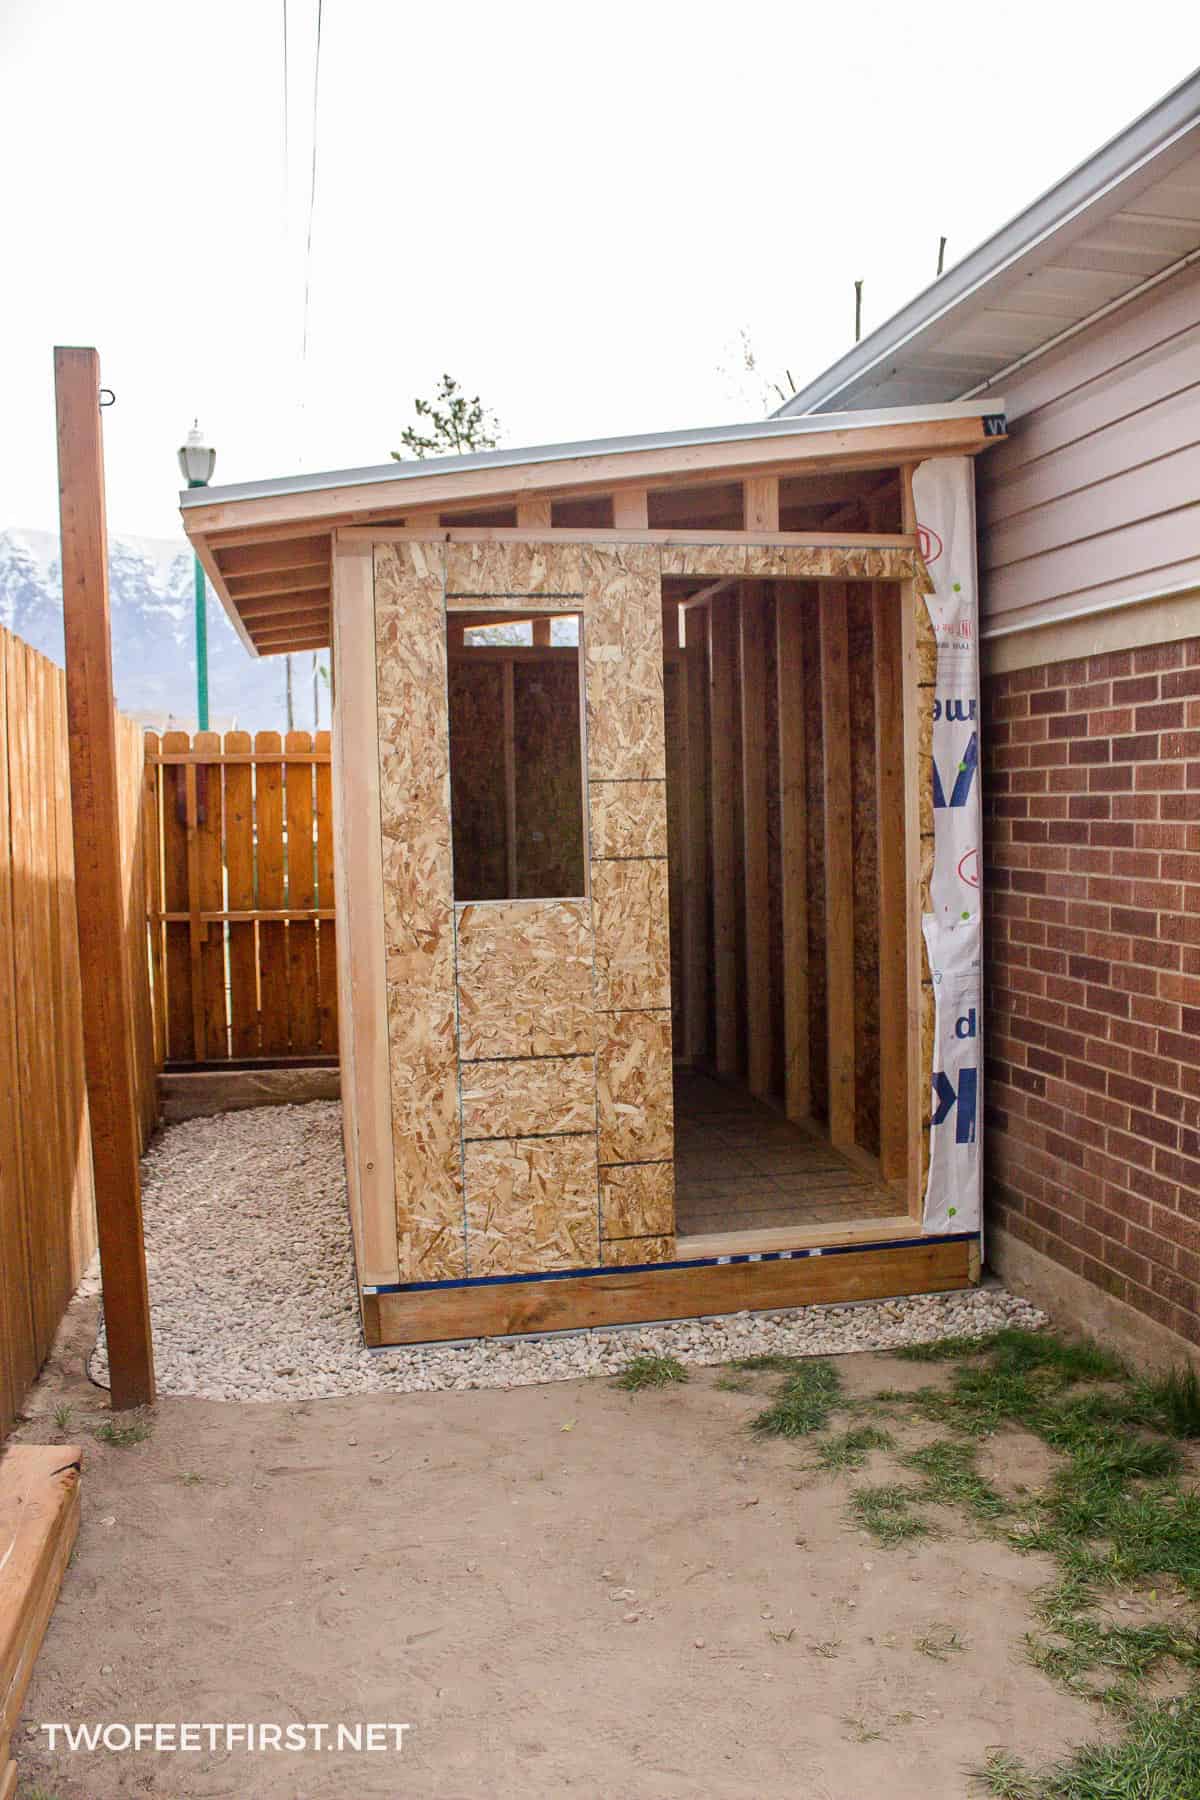
3. Attaching the Sheeting:

Once the frame is complete and secured, you can attach the plywood or OSB sheeting to the walls and roof. Ensure the sheeting is properly nailed or screwed to the frame, and use appropriate spacing to allow for expansion and contraction.

4. Roofing:

Roofing is the more complicated part, but follow your chosen roofing materials' instructions carefully. Whether it's asphalt shingles, metal sheeting or something else, proper installation will ensure weatherproofing and longevity. Often lean-tos have a single slope, simplifying the process.

5. Finishing Touches:

Add any finishing touches, such as a door, window, or paint. A simple coat of weather-resistant paint or sealant will protect your shed from the elements and improve its overall appearance.

Tips and Tricks for Success

  • Take your time: Rushing the process can lead to mistakes. Focus on accuracy and precision.
  • Use a level constantly: This is arguably the most important tool in your arsenal. A level shed is a stable shed.
  • Pre-drill holes: This prevents the wood from splitting when you’re screwing things together.
  • Ask for help: If you get stuck, don't hesitate to ask a friend or family member for assistance.
  • Check local building codes: This is crucial, especially if your lean-to is more substantial.

Commonly Asked Questions

Here are some frequently asked questions about building lean-to sheds:

Q: Do I need a permit to build a lean-to shed?

A: This depends on your local building codes and the size and complexity of your shed. It's always best to check with your local authorities before you begin construction.

Q: What is the best material for the roof?

A: Asphalt shingles are a popular and relatively inexpensive choice. Metal roofing is also a good option, offering greater durability.

Q: How can I make my lean-to shed more weatherproof?

A: Use high-quality materials, ensure proper sealing around windows and doors, and consider adding flashing around the roofline to prevent water leakage.

Q: How long does it take to build a lean-to shed?

A: The construction time varies depending on the size and complexity of the shed, as well as your experience level. A simple lean-to can be built in a weekend, while a more complex structure might take several days or even longer.

Q: Can I use reclaimed lumber to build my lean-to shed?

A: While you can potentially use reclaimed lumber, make sure it's appropriately treated and in good condition to ensure structural integrity and longevity. Inspect it carefully for rot, pests and structural damage.

Building a lean-to shed can be a rewarding experience. With careful planning and attention to detail, you can create a valuable addition to your property that will last for years to come. Remember to always prioritize safety and take your time â€" the result will be worth the effort!

How to Make a Wood Pallet Shed That’s Simple, Sturdy, and Stylish

How to Make a Wood Pallet Shed That’s Simple, Sturdy, and Stylish

Building Your Dream Pallet Shed: Simple, Sturdy, and Stylish

Tired of cluttered garages and overflowing storage spaces? Yearning for a charming and functional addition to your backyard? Building a shed from reclaimed wood pallets offers a surprisingly simple, cost-effective, and environmentally friendly solution. This guide walks you through creating a sturdy and stylish pallet shed, perfect for storing garden tools, bicycles, or anything else you need to keep organized and protected from the elements.

Planning Your Pallet Shed

Before you dive into construction, careful planning ensures a smooth process and a satisfying result. Start by sketching your desired shed dimensions. Consider the available space in your yard and the amount of storage you need. Remember to check local building codes and obtain any necessary permits before starting construction. Next, gather your materials. This includes reclaimed wood pallets (inspect them carefully for soundness and treat them if necessary), screws, posts for the base, roofing material (corrugated metal or asphalt shingles work well), and any desired finishing touches like paint or stain. A detailed shopping list ensures you won't be caught short during the project.

Choosing the Right Pallets

Not all pallets are created equal. Look for sturdy pallets made of hardwood, free from rot, warping, and excessive damage. Avoid pallets marked with the "HT" (heat treated) stamp if you plan to use them for food storage. If the pallets are treated with chemicals, research safe methods of cleaning and preparation before construction. Clean them thoroughly, removing any loose nails, staples, or debris. Once you have a good supply, you can begin the actual building process.

Constructing the Pallet Shed's Foundation

A solid foundation is crucial for a long-lasting structure. Begin by leveling the ground where you intend to build. Use a spirit level and adjust the ground as needed. Then, set concrete posts or treated lumber posts into the ground, creating a perimeter for your shed. Ensure the posts are deeply embedded for stability. This frame will provide support for the pallet walls. Once the posts are securely in place, you can begin assembling the pallet walls.

Assembling the Pallet Walls and Roof

Carefully dismantle any unwanted sections from your pallets to create uniform building blocks. Construct the walls by attaching the pallets to each other using sturdy screws. Ensure the joints are tight and secure. For added strength, consider using metal brackets or corner braces. Once the walls are complete, you can begin assembling the roof. Build a basic frame using treated lumber or reclaimed wood, and then attach your chosen roofing material. Remember to allow for sufficient overhang to protect the walls from rain. Finally, secure the roof to the walls.

Adding Finishing Touches

Once the structural work is complete, personalize your pallet shed. Adding a door is essential for easy access. You can use reclaimed wood or purchase a pre-made door. Paint or stain the pallets to enhance the shed’s appearance and protect the wood from the elements. Consider adding windows for ventilation and natural light. Finally, landscape around the shed to create a cohesive and attractive addition to your outdoor space.

Essential Tools and Materials

Before you begin, gather these essential tools and materials:

  • Reclaimed wood pallets
  • Screws (various sizes)
  • Drill with drill bits
  • Level
  • Measuring tape
  • Saw (circular saw or hand saw)
  • Hammer
  • Safety glasses
  • Work gloves
  • Roofing material
  • Posts for the base
  • Optional: Paint, stain, windows, door

Building a pallet shed is a rewarding project that combines creativity, practicality, and sustainability. By following these steps, you can create a beautiful, functional, and sturdy addition to your property. Enjoy the process and the satisfaction of building something with your own hands!

How to Build a Strong Wooden Pallet Shed with Simple Plans

How to Build a Strong Wooden Pallet Shed with Simple Plans

Building a Sturdy Pallet Shed: A Simple Guide

Tired of clutter piling up in your garage or backyard? Dreaming of a simple, affordable storage solution? Building a shed from reclaimed wooden pallets offers a fantastically budget-friendly and environmentally conscious alternative to expensive pre-fabricated structures. This guide provides clear, step-by-step instructions to help you construct your own durable and attractive pallet shed. Get ready to transform unused space into organized storage!

Planning Your Pallet Shed

Before you dive into construction, careful planning ensures a successful project. First, determine the desired dimensions of your shed. Consider the storage needs and the available space in your yard. Sketch a simple plan, noting the placement of the door, windows (if any), and any internal shelving. Next, source your pallets. Inspect each pallet thoroughly for rot, damage, and loose nails before selecting them. Aim for sturdy pallets made of pressure-treated lumber for optimal durability. Finally, gather your tools and materials. This includes a saw (circular saw is ideal), hammer, nails or screws, a level, measuring tape, safety glasses, work gloves, and potentially a drill with appropriate drill bits.

Essential Materials Checklist

Beyond the pallets, you'll need these items:

  • Strong screws (exterior-grade recommended)
  • Wood shims (for leveling)
  • Concrete blocks or a suitable foundation
  • Roofing material (tar paper, corrugated metal, or shingles)
  • Hinges for the door
  • A door latch or lock
  • Optional: Paint or stain for weather protection

Constructing the Shed Frame

Begin by creating a solid foundation. Concrete blocks provide a simple and effective base, ensuring stability and preventing rot. Level the blocks carefully using shims. Then, assemble the pallet walls. For maximum strength, use multiple pallets for each wall, securing them together using screws or nails. Pay close attention to vertical alignment and reinforce the corners with extra bracing. Remember to leave space for your door opening. Once the walls are complete, carefully lift and secure the walls onto your foundation. Use additional bracing between the walls to increase structural integrity.

Adding the Roof and Finishing Touches

The roof is crucial for protecting your stored items. Construct a simple gable or shed roof using additional pallets or lumber. Ensure the roof frame has adequate support and slope for water runoff. Then, cover the roof with your chosen roofing material. Tar paper provides basic weather protection, while corrugated metal or shingles offer enhanced durability and aesthetics. Finally, install your door using hinges and a latch. Add any desired internal shelving, and consider painting or staining the pallets for added protection and a polished look. Regularly inspect your shed and perform minor repairs as needed.

Safety First!

Remember, safety is paramount. Always wear safety glasses and work gloves to protect yourself from flying debris and splinters. Use caution when handling power tools. If unsure about any step, seek assistance from an experienced builder. Properly disposing of waste materials responsibly concludes the project.

With a little planning and effort, you can easily build a functional and attractive pallet shed to keep your belongings safe and organized. Enjoy your new storage solution!

How to Build a Strong and Functional Wood Pallet Shed on a Budget

How to Build a Strong and Functional Wood Pallet Shed on a Budget

Constructing a Budget-Friendly and Robust Wood Pallet Shed

The allure of a dedicated storage space is undeniable, particularly for homeowners seeking to organize outdoor equipment and supplies. However, the cost of commercially available sheds can be prohibitive. A compelling alternative lies in repurposing readily available and cost-effective materials: reclaimed wood pallets. This comprehensive guide details the process of constructing a strong and functional wood pallet shed while adhering to a stringent budget. Careful planning and execution are key to achieving a durable and aesthetically pleasing structure.

Phase 1: Planning and Material Acquisition

Before commencing construction, meticulous planning is paramount. This phase involves determining the shed's dimensions, location, and material sourcing, ensuring a smooth and efficient building process.

Determining Shed Dimensions and Location

The dimensions of your pallet shed should be dictated by your storage needs and the available space. Consider the types and quantities of items you intend to store. Accurate measurements are crucial to avoid material waste and structural instability. Furthermore, select a location that is level, provides adequate drainage, and complies with local building regulations. Proximity to a power source might also be advantageous, depending on your planned use of the shed.

Sourcing and Assessing Pallets

The cornerstone of this project is the acquisition of suitable wood pallets. Source pallets from reputable businesses, ensuring they are heat-treated and free from pests or significant damage. Inspect each pallet thoroughly for signs of rot, warping, or broken boards. Aim for pallets of consistent size and quality to simplify construction. Consider the type of wood; hardwood pallets are more durable but may be harder to find. Calculate the required number of pallets based on your chosen shed dimensions. Remember that you may need extra pallets for unforeseen repairs or replacements.

Gathering Additional Materials and Tools

Beyond pallets, several additional materials are essential. This includes:

  • Concrete blocks or a suitable foundation: To ensure stability and prevent ground rot.
  • Pressure-treated lumber: For framing, supports, and any structural elements not constructed from pallets.
  • Roofing materials: Consider corrugated metal sheets, asphalt shingles, or recycled materials for cost-effectiveness.
  • Fasteners: A variety of screws, nails, and possibly bolts depending on your chosen construction methods.
  • Exterior-grade wood sealant or paint: For protection against the elements and enhanced aesthetics.
  • Hardware cloth or mesh: To deter pests and small animals.

Necessary tools include a measuring tape, saw (circular saw or hand saw), hammer, drill, screwdriver, level, and safety glasses. Consider renting power tools if purchasing them isn’t feasible.

Phase 2: Foundation and Frame Construction

A solid foundation is crucial for the longevity and structural integrity of your pallet shed. Proper framing will ensure the shed's overall stability and shape.

Preparing the Foundation

Level the chosen ground area thoroughly. For a simple and budget-friendly foundation, use concrete blocks. Arrange them to form a perimeter matching your shed's dimensions. Ensure the blocks are level and stable. Alternatively, a compacted gravel base can be used, providing drainage and a stable surface. Avoid directly placing the pallets on the bare ground to prevent rot and pest infestation.

Constructing the Frame

Using pressure-treated lumber, build a frame around the foundation. This frame acts as the primary support structure for the pallet walls. Construct a rectangular frame, ensuring all corners are square and level using a spirit level. Secure the frame to the concrete blocks or gravel base using appropriate fasteners. The frame should be robust enough to support the weight of the pallets and the roofing material.

Erecting the Pallet Walls

Carefully attach the pallets to the frame. Ensure the pallets are tightly fitted together and aligned. Use screws or nails to secure them to the frame. Consider using additional bracing, particularly at corners and junctions, to enhance structural strength. Stagger the pallet joints to enhance stability and distribute the load effectively. Fill any gaps between pallets with suitable sealant or wood filler for weatherproofing.

Phase 3: Roofing and Finishing Touches

The roofing and finishing touches complete the shed, providing protection from the elements and enhancing its overall appearance.

Installing the Roof

The roof structure depends on your chosen roofing material. You may opt for a simple gable roof or a shed roof. Construct the roof framing using pressure-treated lumber, ensuring adequate support and stability. Secure the chosen roofing material (corrugated metal sheets, asphalt shingles, etc.) to the framing, following the manufacturer's instructions. Proper sealing is crucial to prevent water leaks.

Adding Doors and Windows

Construct a door frame using pressure-treated lumber and incorporate a suitable door. Pallet wood can be utilized for creating a rustic door, but ensure adequate strength and security. Similarly, consider incorporating windows for ventilation and natural light. Pallet wood can be repurposed, but consider using glass or plexiglass for a more robust solution.

Sealing and Finishing

Apply a high-quality exterior-grade wood sealant or paint to all exposed wood surfaces. This will protect the wood from the elements and prolong the lifespan of the shed. Select a durable and weather-resistant finish. Consider adding a layer of pest control to deter insects and animals.

Phase 4: Safety and Considerations

Prioritize safety throughout the entire construction process and consider environmental impact.

Safety Precautions

Always wear appropriate safety gear, including safety glasses, gloves, and work boots. When using power tools, follow all safety instructions and wear appropriate hearing protection. Be mindful of the weight of materials and seek assistance when lifting heavy objects. Work in a well-lit area and maintain a clean workspace to prevent accidents.

Environmental Considerations

The repurposing of pallets contributes to sustainable building practices. Ensure the pallets are sourced responsibly and ethically. Dispose of any waste materials responsibly, recycling or repurposing whenever possible. Consider using eco-friendly paints and sealants to minimize environmental impact.

By following these steps, you can successfully construct a durable, functional, and budget-friendly wood pallet shed. Remember that thorough planning and careful execution are key to achieving a structure that meets your needs and enhances your property. Enjoy the satisfaction of creating something useful and unique from reclaimed materials.

How to Build a Lean-To Shed: Step-by-Step Instructions for Beginners

How to Build a Lean-To Shed: Step-by-Step Instructions for Beginners

Building Your First Lean-To Shed: A Beginner's Guide

Ready to conquer your outdoor storage woes and build something amazing with your own two hands? A lean-to shed is the perfect project for beginner DIYers. It's relatively simple to construct, requires fewer materials than a freestanding shed, and provides valuable sheltered space. This step-by-step guide will walk you through the entire process, ensuring you build a sturdy and functional lean-to shed with confidence.

Planning and Preparation: Laying the Foundation for Success

Before you even grab a hammer, careful planning is crucial. Start by deciding on the location for your shed. Consider proximity to your house (for easy access), existing structures for support, and the overall aesthetic. Next, determine the dimensions of your lean-to. Sketch a simple design, noting the length, width, and height. Measure twice, cut once! This seemingly simple step will save you headaches down the line. Finally, obtain all necessary permits and acquire your building materials. A detailed shopping list, including lumber, roofing materials, fasteners, and tools, will streamline the construction process. Remember to account for any potential waste or unexpected needs.

Essential Tools and Materials

Gather these essential tools and materials before you begin:

  • Measuring tape
  • Level
  • Shovel
  • Post-hole digger (if needed)
  • Circular saw or hand saw
  • Drill with various drill bits
  • Hammer
  • Safety glasses and work gloves
  • Pressure-treated lumber for the frame
  • Roofing material (e.g., corrugated metal, asphalt shingles)
  • Fasteners (nails, screws)
  • Concrete mix (for posts, if needed)

Building the Frame: The Backbone of Your Lean-To

Begin construction by building the frame of your lean-to. This is where your planning pays off. If you're leaning your shed against an existing structure, secure the rear support beams to it using appropriate fasteners. Ensure they are level and plumb. For a free-standing rear wall, you’ll need to dig post holes, set the posts in concrete, and then attach the horizontal beams. Next, erect the side supports, ensuring they are perfectly square and level. Finally, attach the top horizontal beam, completing the rectangular frame. Carefully check all measurements throughout this stage to guarantee a stable structure.

Securing the Support

The strength and stability of your lean-to shed hinges on the proper securing of your support beams. Whether you are attaching to an existing structure or using posts, ensure a strong and level base. Consider using additional bracing or supports for added stability, especially if your shed will be in a high-wind area.

Adding the Roof: Providing Shelter and Protection

With the frame complete, it’s time to add the roof. This step involves attaching the roof rafters to the top beam and the rear support. Make sure the rafters are evenly spaced and securely fastened. Consider using metal brackets for added strength and support. Once the rafters are in place, cover them with your chosen roofing material. Follow the manufacturer's instructions carefully for installation. Remember to ensure proper overlap and sealing to prevent leaks. Take your time and double-check every step to achieve a water-tight and durable roof.

Finishing Touches: Adding the Final Details

The final steps involve adding any finishing touches to personalize and enhance your new lean-to. Consider adding siding to the walls, if desired, for a more finished look. Install a door if needed for easy access. You could paint the shed to match your house or choose a bold color for a unique statement piece. Adding shelves or other storage solutions inside will make it more functional. Finally, step back and admire your handiwork! You’ve successfully built your own lean-to shed, a testament to your DIY skills and a valuable addition to your property.

Remember: Safety first! Always wear appropriate safety gear and follow proper building codes. If you are unsure about any step, consult a professional.

DIY Basic Shed Plans: Simple and Functional Design for Any Yard

DIY Basic Shed Plans: Simple and Functional Design for Any Yard

DIY Basic Shed Plans: Simple and Functional Design for Any Yard

Tired of clutter piling up in your garage or overflowing from your closets? A shed offers the perfect solution! Building your own shed not only provides valuable extra storage space but also offers a rewarding DIY project. This guide provides simple, functional shed plans that you can adapt to fit your yard and needs, even if you're a beginner DIYer. We'll walk you through the process, demystifying shed construction and empowering you to create the perfect addition to your outdoor space. Forget expensive pre-fabricated options â€" you can build a sturdy, customized shed yourself!

Planning Your Basic Shed

Before you grab your tools, careful planning is crucial. Consider the following:

Size and Dimensions

Start by determining the size you need. A small shed (6ft x 8ft) is perfect for basic storage, while a larger one (8ft x 10ft or larger) accommodates more items. Sketch your desired dimensions, keeping in mind local building codes and your yard’s available space. Accurate measurements prevent costly mistakes later.

Location, Location, Location

Choose a level spot in your yard with easy access. Consider sunlight and drainage â€" you'll want a location that minimizes water buildup and provides sufficient sunlight for proper ventilation if needed. Check for underground utilities before digging foundations.

Materials and Tools

Pressure-treated lumber forms the foundation of this basic shed. This resists rot and insects. You'll also need plywood for siding and roofing, screws, nails, a level, measuring tape, saw, drill, and post hole diggers (or a power auger for larger projects). Create a detailed materials list to avoid unnecessary trips to the hardware store. Don't forget any needed hardware such as hinges, a latch, and potentially window frames if desired.

Construction Steps: A Simple Approach

This section outlines the basic construction steps. Remember to always prioritize safety and wear appropriate protective gear.

Foundation

Build a simple concrete slab or use pressure-treated lumber for a foundation. For a concrete slab, level the ground, create a formwork, and pour concrete, ensuring a level surface. A pressure-treated lumber foundation requires creating a frame from treated 4x4s, set in concrete-filled post holes dug at the corners and at intervals along the sides for support.

Framing the Walls and Roof

Construct the walls using pressure-treated lumber for the base and studs. Follow your dimensions carefully, ensuring square corners using a speed square. Once the walls are framed, attach plywood sheathing to the exterior. The roof can be a simple gable roof, which is easy to construct. Frame the roof rafters and attach plywood sheathing. Ensure the roof is adequately sloped to allow water runoff.

Siding and Roofing

Apply your chosen siding material (plywood is a cost-effective option). For the roof, use asphalt shingles or roofing felt, ensuring proper overlap for watertightness. You can add extra touches, like painting the exterior to match your house or adding decorative trim.

Finishing Touches

Install a door (pre-hung doors simplify the process), hinges, and a latch. Add any windows you've planned. Consider adding shelving inside to maximize storage space. Finally, clean up the area and admire your handiwork!

Beyond the Basics: Customization Options

Once you have the basic shed built, you can customize it to fit your specific needs.

  • Add windows: Improve ventilation and natural light.
  • Install shelving: Optimize interior storage.
  • Add a workbench: Turn your shed into a workshop.
  • Paint the exterior: Enhance the aesthetic appeal.
  • Install electricity: Provide power for tools and lighting (requires professional help for wiring).

Building your own shed is a rewarding experience that provides lasting value. By following these simple plans and prioritizing careful planning, you'll have a functional and personalized storage solution in no time. Remember to adjust these plans to fit your specific needs and always prioritize safety throughout the building process.

Build Your Own Shed: Simple Basic Plans for Any Skill Level

Build Your Own Shed: Simple Basic Plans for Any Skill Level

Build Your Own Shed: Simple Basic Plans for Any Skill Level

So, you're dreaming of a shed? A little haven for your tools, your gardening supplies, or maybe just a quiet spot to escape? Building your own shed might seem daunting, but trust me, it's way more achievable than you think! This guide will walk you through the process, from choosing the right plan to celebrating your finished masterpiece (with a well-deserved cup of tea, naturally).

Planning Your Perfect Shed: Size Matters (and So Does Location!)

Before you even think about hammering a nail, you need a plan. This isn’t about architectural blueprints; it’s about deciding what you need your shed to do.

Size and Purpose:

How much stuff are you planning to store? A tiny tool shed requires a much smaller footprint than a workshop or a garden storage unit. Consider your needs carefully. A 6x8 foot shed is a great starting point for most people, while a 10x12 provides more space for bigger projects. Remember to factor in the space you'll need to move around comfortably inside!

Location, Location, Location:

Think about access. Will you need to drive a wheelbarrow close to it? Do you need easy access from your house? Check local regulations too â€" some areas have restrictions on shed size and placement. Consider sunlight and drainage as well. You don't want your shed becoming a soggy swamp!

Materials: Wood, Metal, or Plastic?

This is a big decision! Wood offers a classic, customizable look, but requires more maintenance. Metal sheds are durable and low-maintenance, but can be more expensive and less aesthetically pleasing. Plastic sheds are budget-friendly and easy to assemble but might not be as sturdy or long-lasting.

Choosing Your Shed Design: Simple is Best (Especially for Beginners)

Don't get overwhelmed by fancy designs! A simple, rectangular shed is perfect for a first-time builder. Plenty of free and inexpensive plans are available online â€" just search for "simple shed plans" on Google, Pinterest, or even YouTube. Look for plans that include detailed instructions and diagrams. Clear, step-by-step instructions are your best friend!

Essential Elements of a Basic Shed Plan:

  • Foundation: A concrete slab, compacted gravel, or even pressure-treated lumber can serve as a solid base.
  • Framing: This forms the structure of your shed's walls and roof. You'll typically use pressure-treated lumber for this.
  • Sheathing: This is the material that covers the framing, providing a weatherproof exterior. Plywood is a popular choice.
  • Roofing: Asphalt shingles are a common and affordable option.
  • Doors and Windows: Choose appropriately sized doors and windows for your needs and budget.
  • Gathering Your Tools and Materials: Be Prepared!

    Having all your tools and materials ready before you begin will save you time and frustration. Trust me on this one! It's much easier to build with everything at hand than constantly running to the hardware store.

    Essential Tools:

  • Measuring tape
  • Level
  • Hammer
  • Saw (circular saw or hand saw)
  • Drill
  • Screwdriver bits
  • Safety glasses
  • Work gloves
  • Essential Materials (This will vary depending on your plan):

  • Pressure-treated lumber
  • Plywood or other sheathing material
  • Roofing material (shingles, etc.)
  • Nails or screws
  • Doors and windows
  • Hardware (hinges, handles, etc.)
  • Concrete mix (if building a concrete foundation)
  • Building Your Shed: Step by Step (A Simplified Overview)

    The exact steps will vary depending on your chosen plan, but here's a general overview. Remember to always consult your specific plan for detailed instructions.

    Step 1: Prepare the Foundation:

    Level the ground and construct your chosen foundation. This is crucial for a stable shed.

    Step 2: Build the Walls:

    Assemble the wall frames according to your plan, attaching sheathing to the outside.

    Step 3: Erect the Walls:

    Carefully lift the walls into position and secure them to the foundation.

    Step 4: Construct the Roof:

    Build the roof trusses (or use pre-fabricated trusses) and attach them to the walls.

    Step 5: Install Roofing:

    Apply your chosen roofing material, ensuring it's properly sealed and waterproof.

    Step 6: Add Doors and Windows:

    Install doors and windows, ensuring they are properly sealed and secure.

    Step 7: Finish Touches:

    Add any finishing touches, such as trim, paint, or sealant.

    Celebrating Your Achievement!

    Congratulations! You've built your own shed. Take a moment to admire your handiwork. That feeling of accomplishment is worth more than any store-bought shed. Now, go grab that well-deserved cup of tea and enjoy your new space!

    Commonly Asked Questions

    Q: Do I need any special skills to build a shed?

    A: No, basic DIY skills and a willingness to learn are sufficient. Following a good set of plans is key.

    Q: How long does it take to build a shed?

    A: This depends on the size and complexity of the shed, and your experience. A simple shed can take a weekend for experienced builders, while beginners might need several weekends.

    Q: How much does it cost to build a shed?

    A: Costs vary widely depending on the size, materials, and your location. Expect to spend anywhere from a few hundred to a couple of thousand dollars.

    Q: What if I make a mistake?

    A: Don't worry, mistakes happen! Take your time, double-check your measurements, and if something goes wrong, don't be afraid to ask for help or consult your plans again. Sometimes, a little creative problem-solving is all you need.

    Q: Do I need a building permit?

    A: Check your local building codes. Many areas require permits for sheds above a certain size. It's always better to be safe than sorry.

    Remember, building a shed is a rewarding experience. Enjoy the process! And if you have any other questions, feel free to ask.

    Lean-To Shed Build: A DIY Project for Maximum Yard Organization

    Lean-To Shed Build: A DIY Project for Maximum Yard Organization

    Lean-To Shed Build: A DIY Project for Maximum Yard Organization

    The accumulation of yard tools, gardening supplies, and outdoor equipment can quickly overwhelm even the most organized homeowner. A cluttered yard not only detracts from the aesthetic appeal of your property but also hampers efficiency and accessibility. Constructing a lean-to shed provides a practical and cost-effective solution to this common problem, offering ample storage space while adding a functional element to your landscape. This comprehensive guide details the process of building a lean-to shed, empowering DIY enthusiasts to maximize their yard organization.

    Planning and Design Considerations

    Before embarking on the construction process, meticulous planning is crucial for a successful outcome. Careful consideration of several factors will ensure your lean-to shed meets your specific needs and complies with local building regulations.

    Determining Size and Location

    The dimensions of your lean-to shed are dictated by the amount of storage space required and the available area in your yard. Consider the types and quantities of items you intend to store. Accurate measurements are vital for material estimation and construction accuracy. The location should be chosen strategically, considering proximity to the intended usage area, accessibility, and sunlight exposure. Ensure the chosen location complies with any local setback regulations and does not interfere with utility lines or drainage systems.

    Material Selection

    The choice of materials significantly impacts the durability, aesthetics, and cost of your lean-to shed. Pressure-treated lumber is a popular choice for its resistance to rot and insect infestation. For a more aesthetically pleasing and potentially longer-lasting structure, consider using cedar or redwood. The roofing material should be selected based on factors like budget, climate, and aesthetic preferences. Options include asphalt shingles, metal roofing, or polycarbonate sheets. Ensure all materials meet the required building codes and standards for your region.

    Foundation Considerations

    The foundation provides structural support for your lean-to shed. The choice of foundation depends on several factors, including soil conditions, budget, and complexity desired. A simple concrete slab provides a robust and level base. Alternatively, a gravel base offers a more cost-effective solution for well-drained soil conditions. For areas with poor drainage, a pier-and-beam foundation might be necessary to prevent water damage. Ensure the foundation is properly leveled to ensure the structural integrity of the shed.

    Construction Process: A Step-by-Step Guide

    The actual construction process can be broken down into distinct stages, ensuring a systematic and efficient approach. Proper preparation and adherence to safety guidelines are paramount throughout the entire process.

    Foundation Preparation and Installation

    Begin by preparing the area for the foundation. Clear the area of vegetation, debris, and any existing obstructions. If using a concrete slab, excavate to the required depth and width, ensuring proper compaction of the base. For gravel foundations, level the ground and lay a layer of gravel, compacting it thoroughly. For pier-and-beam foundations, dig holes for the piers, ensuring they are set at the appropriate depth and spacing. Install the piers, ensuring they are level and plumb.

    Framing the Walls and Roof

    The framing of the walls and roof constitutes the structural skeleton of the lean-to shed. Using pressure-treated lumber, construct the wall frames according to your pre-determined dimensions. Securely connect the wall frames using appropriate fasteners, ensuring they are square and plumb. The roof framing involves constructing rafters that connect to the top plate of the wall frames and a ridge board. Ensure the rafters are properly spaced and secured to provide adequate support for the roofing material.

    Roofing Installation

    Once the roof framing is complete, install the chosen roofing material. Follow the manufacturer's instructions for installation. Ensure proper ventilation is incorporated to prevent moisture buildup. Proper flashing and sealing around edges and penetrations are crucial to prevent leaks.

    Wall Sheathing and Siding

    Attach wall sheathing to the framed walls, providing a solid base for the exterior siding. The choice of siding depends on aesthetic preferences and budget. Options include plywood, vinyl, or metal siding. Ensure the siding is properly installed, ensuring weathertightness and durability.

    Door and Window Installation (Optional)

    If desired, install a door and/or windows into the framed openings. Ensure proper sealing and weather stripping to prevent drafts and leaks. Use appropriate hardware and ensure the door and windows operate smoothly.

    Finishing Touches and Safety Considerations

    Once the primary construction is complete, several finishing touches enhance the functionality and aesthetics of the lean-to shed. Prioritizing safety throughout the entire process is crucial for a successful and injury-free project.

    Interior Finishing

    The interior of the lean-to shed can be customized to meet your specific storage needs. Consider adding shelves, pegboards, or other organizational features to optimize space and accessibility. A coat of paint or sealant can protect the interior from moisture and improve the overall appearance.

    Exterior Finishing

    Apply a protective sealant or paint to the exterior of the shed to enhance its durability and aesthetic appeal. This will help protect the structure from the elements and extend its lifespan. Consider adding landscaping around the shed to enhance the overall look of your yard.

    Safety Precautions

    Throughout the entire construction process, safety should be the top priority. This includes:

    • Wearing appropriate personal protective equipment (PPE), including safety glasses, gloves, and hearing protection.
    • Using proper lifting techniques to avoid back injuries.
    • Ensuring the work area is well-lit and free of obstructions.
    • Following all manufacturer's instructions for tools and materials.
    • Using caution when working with power tools.
    • Ensuring proper structural support during construction.

    Conclusion

    Building a lean-to shed is a rewarding DIY project that significantly improves yard organization and functionality. By following this comprehensive guide and prioritizing careful planning and safety, homeowners can create a customized storage solution that enhances both the practicality and aesthetic appeal of their outdoor space. Remember to always consult with local building codes and regulations before starting your project. The satisfaction of creating a valuable addition to your property through your own efforts is an invaluable reward.

    How to Use Wood Pallets to Create a Low-Cost, High-Quality Shed

    How to Use Wood Pallets to Create a Low-Cost, High-Quality Shed

    Building a Budget-Friendly Shed with Reclaimed Pallets

    Tired of overflowing garages and cluttered yards? Dreaming of a stylish, functional shed without breaking the bank? You can achieve that dream by using readily available and surprisingly versatile wood pallets! This guide will walk you through building a low-cost, high-quality shed using reclaimed pallets, transforming discarded materials into a valuable addition to your property.

    Planning Your Pallet Shed Project

    Before diving into construction, careful planning is essential. Begin by determining the size and location of your future shed. Consider the space available, local building codes, and the amount of storage you need. Sketch a simple plan, including dimensions and the layout of doors and windows. This plan will serve as your roadmap throughout the project. Next, source your pallets. Look for sturdy pallets made from pressure-treated lumber (ensure it’s suitable for exterior use) or untreated softwood. Inspect each pallet carefully for damage; discard any that show significant rot or insect infestation. Finally, gather necessary tools and materials. This will include things like a hammer, saw, measuring tape, screws, nails, and potentially a drill. Remember safety glasses and gloves are also crucial components for this project.

    Constructing the Shed's Frame

    Building the Base

    Start by creating a level base for your shed. You can use concrete, compacted gravel, or even a sturdy wooden platform. The stability of this base is critical for the longevity of your structure. Once you have a level base, begin assembling the pallet frame. You’ll likely need to disassemble some pallets to obtain the right-sized lumber for the frame. Consider using longer, stronger pieces for corner posts for extra support.

    Assembling the Walls

    Construct the walls using the disassembled pallet wood. You can use the existing pallet structures for sections of the walls, adding additional framing where needed for extra support and stability. Ensure you create openings for windows and doors. For increased stability, reinforce the corners with extra wood bracing. Remember to check your measurements frequently to ensure everything remains square and level.

    Raising the Walls and Adding the Roof

    Carefully lift the walls into position on the base, ensuring they are perfectly aligned. Secure the walls together using sturdy bracing and fasteners. Next, build the roof structure. This could involve a simple gable roof, or a more complex design, depending on your preferences and the overall structure. Once again, robust framing is key to support the weight of the roof and potential snowfall. Remember to leave an overhang to protect the walls from the elements.

    Finishing Touches and Considerations

    Once the frame is complete, add the roof sheeting. You can use plywood, corrugated metal, or even more reclaimed materials. Secure the sheeting firmly to protect your shed from rain and snow. Install doors and windows. Remember to use weather-resistant materials and seal any gaps to prevent drafts and water damage. Finally, consider adding a layer of paint or sealant to protect the wood from the elements and enhance the shed’s appearance. You can choose a natural finish to showcase the reclaimed wood, or paint it to match your home or landscape.

    Extra Tips for Success

    • Prioritize safety: Always wear appropriate safety gear.
    • Use quality fasteners: Choose screws and nails appropriate for outdoor use.
    • Check local building codes: Ensure your shed meets all regulations.
    • Consider insulation: For added protection from the elements, you can add insulation.
    • Get creative with design: Let your personal style shine through with unique design features.

    Building a pallet shed is a rewarding project that combines creativity, resourcefulness, and a commitment to sustainability. By following these steps, you can create a high-quality, durable, and aesthetically pleasing shed without emptying your wallet. Enjoy the process and the satisfaction of transforming reclaimed materials into a valuable asset for your property!

    Step-by-Step Wood Pallet Shed Plans for Beginners and DIY Builders

    Step-by-Step Wood Pallet Shed Plans for Beginners and DIY Builders

    Step-by-Step Wood Pallet Shed Plans for Beginners and DIY Builders

    Constructing a shed from reclaimed wood pallets offers a budget-friendly and environmentally conscious alternative to traditional shed building. This comprehensive guide provides detailed instructions for beginners and DIY enthusiasts, outlining each stage of the process from planning to completion. While seemingly simple, careful planning and execution are crucial for a structurally sound and aesthetically pleasing result.

    Phase 1: Planning and Preparation

    Assessing Your Needs and Site Selection

    Before embarking on this project, meticulous planning is paramount. Begin by defining your shed's purpose. Will it serve as storage for gardening tools, bicycles, or other equipment? This dictates the necessary size and internal layout. Next, select a suitable location on your property. Consider factors such as proximity to power sources (if needed), accessibility, and compliance with local building codes and regulations. Ensure the ground is level to simplify foundation construction. Adequate sunlight and drainage are also essential considerations.

    Gathering Materials and Tools

    The foundation of your pallet shed rests on the quality of your materials. Source a sufficient number of sturdy and intact pallets. Inspect each pallet meticulously for rot, significant damage, or protruding nails. Discard any unsuitable pallets. The number required depends on the shed's dimensions, but plan for a surplus to account for potential damage or miscalculations. Beyond pallets, you will need:

    • Foundation materials: Concrete blocks, gravel, or pressure-treated lumber for a base.
    • Fasteners: Galvanized nails, screws, and possibly construction adhesive.
    • Framing lumber (optional): For added structural support, particularly if you intend to create walls above the pallet height.
    • Roofing materials: Tar paper, plywood, corrugated metal, or asphalt shingles.
    • Door and window components (optional): These can be sourced from reclaimed materials or purchased new.
    • Exterior sealant or paint (optional): To protect the wood from the elements.

    In addition to materials, assemble the necessary tools: a hammer, saw (circular saw preferred), measuring tape, level, shovel or post hole digger (for a foundation), drill, safety glasses, work gloves, and potentially a nail gun for faster construction.

    Preparing the Pallets

    Once you have your pallets, prepare them for construction. Thoroughly inspect each pallet again for loose nails or splinters. Remove any loose nails and hammer down any protruding ones to prevent injury. Consider cleaning the pallets to remove dirt, debris, and any potential contaminants. If desired, sand down rough edges and surfaces for a smoother finish. For added durability, apply a wood preservative or sealant before assembly.

    Phase 2: Construction

    Creating the Foundation

    A solid foundation is essential for a stable and long-lasting shed. Several options exist: a simple gravel base, concrete blocks, or a more substantial pressure-treated lumber frame. For a gravel base, level the ground, create a perimeter, and fill it with compacted gravel. For concrete blocks, create a level base and arrange the blocks accordingly. A pressure-treated lumber frame offers the most robust foundation but requires more advanced carpentry skills. Choose the method that best suits your skill level and budget.

    Assembling the Walls

    Begin constructing the walls by carefully placing the pallets on the foundation, ensuring they are level and aligned. You may need to adjust pallet placement to create a solid, structurally sound wall. Secure the pallets together using galvanized nails or screws, paying close attention to spacing and alignment. For added strength, consider using construction adhesive in conjunction with nails or screws. If using framing lumber, attach the pallets to the frame for enhanced stability. If building taller walls, incorporate additional framing lumber to support the upper sections.

    Constructing the Roof

    The roof design depends on your preference and the overall shed design. A simple gable roof is relatively straightforward. Construct the roof frame using framing lumber if necessary, ensuring it's adequately supported by the walls. Then, attach your chosen roofing material (plywood, metal sheeting, or asphalt shingles). Ensure the roof is adequately sloped to facilitate proper water runoff. Secure the roofing material firmly to prevent wind damage.

    Adding Doors and Windows (Optional)

    If desired, incorporate doors and windows for added functionality and light. You can use reclaimed materials or purchase new ones. Ensure that the door and window frames are securely attached to the pallet structure. Consider using weatherstripping to improve insulation and prevent drafts.

    Phase 3: Finishing Touches

    Final Inspection and Refinements

    After completing the construction, conduct a thorough inspection. Check for any loose parts, gaps, or areas requiring additional reinforcement. Repair any imperfections and ensure the structure is stable and secure. Consider adding extra support bracing where needed.

    Exterior Finishing

    Apply a sealant or paint to protect the wood pallets from the elements. This will prolong the lifespan of your shed and enhance its aesthetic appeal. Choose a sealant or paint suitable for outdoor use and follow the manufacturer's instructions carefully.

    Internal Finishing (Optional)

    If you desire, you can add internal shelving or other organizational features to optimize storage space. Use pressure-treated lumber for any interior framing or shelving to enhance durability.

    Safety Precautions

    Throughout the entire construction process, prioritize safety. Wear safety glasses and work gloves to protect yourself from potential hazards. Handle pallets carefully to avoid splinters. Use caution when working with power tools and always follow manufacturer instructions. If working at heights, use appropriate safety equipment such as harnesses and scaffolding.

    Building a shed from reclaimed wood pallets is a rewarding project that combines practicality, sustainability, and cost-effectiveness. By following these detailed instructions and prioritizing safety, you can create a durable and functional storage solution for your property. Remember to consult local building codes and regulations before commencing construction.

    Tuesday, November 19, 2024

    How to Build a Reliable 6x8 Lean To Shed for Outdoor Use

    How to Build a Reliable 6x8 Lean To Shed for Outdoor Use

    Constructing a Reliable 6x8 Lean-To Shed for Outdoor Use

    This comprehensive guide details the process of building a robust and durable 6x8 lean-to shed, suitable for various outdoor storage needs. The instructions are designed for individuals with basic carpentry skills and access to standard power tools. Safety precautions are paramount throughout the construction process, and adherence to local building codes is crucial.

    Phase 1: Planning and Preparation

    Site Selection and Preparation

    The first step involves selecting a suitable location for your shed. Consider factors such as proximity to existing structures, drainage, sunlight exposure, and access for material delivery. The ground should be level and firm. If the ground is uneven, excavation and leveling may be necessary. Clear the area of any debris, vegetation, or obstacles that could interfere with construction.

    Material Selection and Acquisition

    Choosing high-quality materials is crucial for a long-lasting shed. Consider the following:

    • Pressure-treated lumber: Opt for pressure-treated lumber for the foundation, framing, and any components in direct contact with the ground to prevent rot and insect damage.
    • Roofing material: Select a roofing material appropriate for your climate and budget. Asphalt shingles are a common and cost-effective choice. Consider metal roofing for increased durability and longevity.
    • Siding: Choose siding that complements your existing structures and offers adequate protection from the elements. Vinyl, wood, or metal siding are popular options.
    • Fasteners: Use galvanized nails and screws to resist rust and corrosion.
    • Concrete blocks or pier footings: For a stable foundation, concrete blocks or pier footings are recommended. Their placement will depend on local building codes and soil conditions.

    Acquire all necessary materials before commencing construction to avoid delays. Create a detailed materials list based on your chosen design and adjust quantities as needed.

    Tool Acquisition and Safety Precautions

    Ensure you have the necessary tools before starting. This includes, but is not limited to:

    • Measuring tape
    • Level
    • Shovel
    • Post hole digger (if using pier footings)
    • Circular saw
    • Drill
    • Hammer
    • Safety glasses
    • Work gloves
    • Hearing protection

    Safety is paramount. Always wear appropriate safety gear, including safety glasses and work gloves. Use caution when operating power tools, and follow all manufacturer's instructions. Ensure the work area is well-lit and free of obstacles.

    Phase 2: Foundation Construction

    Creating the Base

    The foundation provides stability for your shed. For a 6x8 lean-to, a simple foundation using concrete blocks or pier footings is sufficient. If using concrete blocks, level the ground and lay them in a straight line, ensuring they are level with each other. For pier footings, dig holes approximately 2-3 feet deep, depending on soil conditions and local building codes. Place concrete in the holes and insert pier supports. Allow the concrete to cure completely before proceeding.

    Framing the Foundation

    Once the foundation is complete, construct a perimeter frame using pressure-treated lumber. This frame will support the walls and floor of the shed. Cut the lumber to the appropriate dimensions (6ft x 8ft), ensuring square corners using a speed square. Attach the pieces together using galvanized screws or nails, creating a robust and level rectangular frame.

    Phase 3: Wall and Roof Construction

    Erecting the Walls

    The lean-to design simplifies wall construction. One side will attach directly to an existing structure (e.g., house, garage). For the other three sides, construct vertical wall frames using pressure-treated lumber. These frames should be braced for stability. Ensure the frames are plumb and square. Attach the wall frames to the foundation frame using appropriate fasteners.

    Building the Roof

    The roof of a lean-to shed typically consists of rafters that slope from the higher attachment point (existing structure) to the lower edge. Calculate the rafter length using the Pythagorean theorem to account for the desired roof slope. Cut the rafters to the appropriate length and attach them securely to the wall frames and the existing structure. Use appropriate bracing to maintain the roof's integrity.

    Sheathing and Roofing

    After the rafters are in place, install sheathing (plywood or OSB) to provide a solid surface for the roofing material. Ensure the sheathing is properly nailed or screwed to the rafters. Once the sheathing is complete, install the chosen roofing material according to the manufacturer's instructions. Proper flashing is essential to prevent water leaks, particularly at the junction between the lean-to roof and the existing structure.

    Phase 4: Finishing Touches

    Siding Installation

    Install the chosen siding material over the wall frames. Follow the manufacturer's instructions for proper installation and overlapping. Ensure a weather-tight seal to protect the shed from the elements.

    Door and Window Installation (Optional)

    If desired, install a door and/or windows. Measure and cut openings carefully, ensuring proper framing and weather sealing. Use appropriate hardware for doors and windows. Ensure proper sealing around windows and doors to prevent drafts and water ingress.

    Final Inspection and Maintenance

    Once construction is complete, conduct a thorough inspection to ensure all components are securely fastened and the shed is structurally sound. Address any issues promptly. Regular maintenance, including cleaning and occasional repairs, will prolong the life of your shed.

    By following these detailed steps and prioritizing safety, you can successfully construct a reliable and durable 6x8 lean-to shed. Remember to consult local building codes and adjust the specifications to meet your specific needs and preferences. This comprehensive guide provides a solid foundation for your project, ensuring a successful outcome.

    Free 6x8 Shed Plans PDF: Easy Instructions for Your Backyard Shed

    Free 6x8 Shed Plans PDF: Easy Instructions for Your Backyard Shed

    Free 6x8 Shed Plans PDF: Easy Instructions for Your Backyard Shed

    Dreaming of a tidy backyard and a place to store your gardening tools, bikes, or extra supplies? Building your own 6x8 shed is a fantastic way to achieve this, and it's more achievable than you might think! Forget expensive contractors and complicated blueprints. This article provides you with access to free, easy-to-follow 6x8 shed plans in PDF format, guiding you through each step of the construction process. Get ready to transform your outdoor space and enjoy the satisfaction of a DIY project well done.

    Why Choose a 6x8 Shed?

    A 6x8 shed offers the perfect balance of size and practicality for many homeowners. It's compact enough to fit comfortably in most backyards, yet spacious enough to store a surprising amount of items. Its manageable size makes it an ideal first-time DIY shed project. You'll gain valuable experience in woodworking and construction without being overwhelmed by a larger, more complex build. Consider the versatilityâ€"use it as a workshop, a tool shed, or even a small potting station for your gardening endeavors! The possibilities are endless.

    Accessing Your Free 6x8 Shed Plans PDF

    Finding reliable, free shed plans online can be a challenge. Many websites offer incomplete or poorly designed plans, leading to frustration and potentially costly mistakes. However, we've curated a selection of trustworthy sources providing well-designed, detailed 6x8 shed plans in PDF format that you can download immediately. Simply search online for "free 6x8 shed plans PDF" and look for websites with positive user reviews and clear, high-quality images of the finished shed. Always check the comments section to see what other users have experienced. This will help you avoid any potential pitfalls.

    What to Look For in Your Plans

    Before downloading, scrutinize the plans carefully. Ensure they include:

    • A comprehensive materials list with quantities.
    • Detailed diagrams and step-by-step instructions.
    • Cut lists for all lumber.
    • Clear illustrations of assembly techniques.
    • Information on foundation options.

    Building Your 6x8 Shed: A Step-by-Step Overview

    Once you have your plans, follow these general steps (always refer to your specific plans for detailed instructions):

    1. Prepare the Site: Level the ground and determine your foundation type (concrete slab, gravel base, etc.).
    2. Cut the Lumber: Accurately cut all lumber according to your plans. Use a measuring tape and a quality saw for precise cuts.
    3. Assemble the Frame: Construct the floor frame, wall frames, and roof frame following the plan's instructions carefully. Use appropriate fasteners and ensure all joints are square and secure.
    4. Add Sheathing: Apply plywood or other sheathing to the walls and roof. This provides strength and a surface for siding.
    5. Install Siding and Roofing: Choose your preferred siding and roofing materials and install them according to manufacturer’s recommendations.
    6. Add the Door and Windows: Install the door and windows, ensuring they are properly sealed and secure.
    7. Finish the Interior: Add shelving, paint, or any other desired interior features.

    Safety First!

    Building a shed requires the use of power tools. Always prioritize safety by wearing appropriate safety gear, including safety glasses, work gloves, and hearing protection. Follow all manufacturer's instructions for power tools and take breaks when needed. If you are unsure about any aspect of the build, consult a professional. Remember, safety should always be your top priority.

    Building your own 6x8 shed is a rewarding project that enhances your property value and provides much-needed storage. With the right plans and a little patience, you can achieve this DIY dream. So, download those plans, gather your tools, and start building!

    DIY 6x8 Gable Shed Plans: Perfect for Any Outdoor Space

    DIY 6x8 Gable Shed Plans: Perfect for Any Outdoor Space

    DIY 6x8 Gable Shed Plans: Perfect for Any Outdoor Space

    Dreaming of a tidy backyard or a well-organized workspace? A 6x8 gable shed offers the perfect blend of functionality and compact design. Forget expensive pre-fabricated structures; this article provides you with the essential steps and insights to build your own, saving you money and giving you immense satisfaction. Follow along as we demystify the process and empower you to create a custom-built storage solution tailored to your specific needs.

    Planning Your 6x8 Gable Shed

    Before you even pick up a hammer, careful planning is paramount. This stage sets the foundation for a successful build. First, determine your shed's location. Consider factors like sunlight, access for materials delivery, proximity to power sources (if needed), and local building codes. Next, sketch out a detailed plan, including dimensions, door placement, window placement (if any), and the type of materials you'll use. This will act as your roadmap throughout the construction process. Finally, obtain necessary permits from your local authority. This step prevents future complications and ensures your shed meets local regulations.

    Choosing Your Materials

    The choice of materials greatly influences the shed’s longevity and aesthetic appeal. Pressure-treated lumber is a popular choice for its durability and resistance to rot and insects. Consider using galvanized steel for fasteners to further enhance the structure's resilience. For roofing, asphalt shingles offer a cost-effective and relatively easy-to-install option. Don’t forget about the foundation; a concrete slab provides a stable base, while a compacted gravel base serves as a more budget-friendly alternative. Carefully source all your materials beforehand to avoid delays.

    Building Your 6x8 Gable Shed: A Step-by-Step Guide

    With your plan finalized and materials gathered, the construction begins. The process unfolds in logical stages, ensuring a robust and aesthetically pleasing outcome. Begin with the foundation, ensuring it's level and adequately sized for your shed. Next, construct the floor frame, ensuring proper spacing and secure connections. Then, erect the wall frames, carefully measuring and aligning each piece for a square and plumb structure. Remember to install any windows and doors at this stage. Once the walls are complete, carefully raise them and secure them to the floor frame. Finally, construct and install the roof trusses and apply the roofing material.

    Essential Tools and Safety Precautions

    Building a shed demands a range of tools. You'll need basic carpentry tools such as a measuring tape, saw, hammer, level, and drill. More specialized tools, like a circular saw, might expedite the process. Remember, safety is paramount. Always wear safety glasses, work gloves, and appropriate footwear. Follow safe practices when using power tools and ensure you have adequate support when lifting heavy materials.

    Finishing Touches and Beyond

    Once the main structure is complete, focus on the finishing touches. Add siding to protect the walls from the elements, ensuring it's properly sealed and weatherproofed. Install gutters and downspouts to manage rainwater effectively. A fresh coat of paint or stain can enhance the shed's appearance and offer additional protection. Consider adding features such as shelving, workbenches, or electrical outlets, depending on your intended use.

    Building your own 6x8 gable shed is a rewarding experience. It’s a testament to your DIY skills and a valuable addition to your outdoor space. Remember to take your time, follow the plans meticulously, and celebrate the accomplishment of building something durable and useful with your own hands. Happy building!

    How to Gather Materials for Your DIY 6x8 Shed Build

    How to Gather Materials for Your DIY 6x8 Shed Build

    Gathering Your Arsenal: Materials for Your DIY 6x8 Shed

    Okay, so you're ready to build your own 6x8 shed! That's awesome. Building your own shed is a fantastic feeling, a real accomplishment. But before you grab that hammer, let’s talk about something crucial: gathering the right materials. This isn’t just a trip to the hardware store; it’s a carefully planned expedition. We'll break it down step by step so you’re prepared for this exciting project.

    The Foundation: Planning and Measurements

    Before you even think about lumber, you NEED a solid plan. This isn't a "wing it" kind of project. Seriously, measure twice, cut once. And measure *again*.

    Accurate Site Preparation

    This is where you determine the *exact* location of your shed. Consider things like drainage, sunlight, access, and any existing utilities or landscaping. Mark the perimeter with stakes and string, ensuring it’s perfectly square (use a measuring tape and a carpenter's square!). Clear the area of debris, vegetation, and anything else that could interfere.

    Choosing Your Foundation Type

    Your foundation is critical. A 6x8 shed might seem small, but a poorly constructed base will ruin everything. Consider these options:

    • Concrete Slab: The strongest and most permanent option. Requires some skill and potentially renting concrete mixing equipment.
    • Gravel Base: A simpler, more budget-friendly choice, suitable for well-drained soil. Requires leveling the ground meticulously.
    • Pressure-Treated Skids/Sleepers: A good compromise between cost and durability. Provides some elevation, helping with drainage and preventing rot. Make sure to use pressure-treated lumber rated for ground contact.

    Once you've chosen your foundation, factor in the materials needed (cement, gravel, pressure-treated lumber, etc.)

    The Lumber Yard: Your Main Source

    This is where the fun (and potentially the overwhelming part) begins. You'll need several types of lumber, and getting the right amount is key. Overbuying is wasteful, underbuying is frustrating. A detailed plan will help immensely here.

    Pressure-Treated Lumber for the Foundation and Floor

    If you're going with a gravel base or pressure-treated skids, you'll need this for the ground contact. The quantity depends on your chosen foundation method. A good lumber yard associate can help you calculate this. Ensure you use pressure-treated lumber rated for ground contact to prevent rot and pest infestation.

    Framing Lumber for the Walls and Roof

    This is where you'll need the bulk of your lumber. Typical framing lumber is 2x4s (or 2x6s for extra sturdiness). You'll need enough for wall studs, roof rafters, and any internal bracing. Get your plan reviewed to calculate the quantity needed. Again, a friendly lumber yard worker will assist you here, and they usually offer cutting services for longer pieces.

    Plywood for Sheathing and Flooring

    Plywood is essential for creating solid surfaces. You’ll need sheets for the walls (sheathing), floor, and possibly the roof (depending on your roofing material). Common sizes are 4x8 sheets. Figure out the square footage you need to cover and buy accordingly. Consider the grade of plywood; exterior-grade is essential for walls and floors. Think about the thickness too, more thickness means more strength and durability.

    Additional Lumber Considerations

    Don't forget smaller pieces! You'll need lumber for:

    • Door and Window Frames: Precise measurements are crucial here.
    • Trim Boards: For finishing the edges of the walls and around doors and windows.
    • Fascia Boards: For the edge of the roof overhang.

    Beyond Lumber: Other Essential Materials

    Lumber is the lion's share, but there's plenty more you'll need. Let’s not forget the little things!

    Fasteners

    You'll need a variety of fasteners, including:

    • Nails: Different sizes for framing, sheathing, and finishing.
    • Screws: For securing things like trim and possibly the roofing.
    • Construction Adhesive: For extra strength and weatherproofing.

    Roofing Materials

    Consider your budget and the climate. Options include:

    • Asphalt Shingles: Relatively inexpensive and widely available.
    • Metal Roofing: More durable and long-lasting, but more expensive.

    Calculate the square footage of your roof to determine the amount of roofing material needed.

    Doors and Windows

    Choose the size and style that suits your needs. Measure carefully!

    Hardware

    Don’t forget:

    • Hinges for the door.
    • A door handle and lock.
    • Window latches or handles (if applicable).

    Finishing Touches

    Consider paint or stain to protect the wood and add a personal touch. You might also need sealant for the windows and doors to prevent leaks.

    Where to Buy Your Materials

    Your local home improvement stores (like Home Depot or Lowe's) are good options for many items. Lumber yards offer a wider selection and often better prices for lumber, particularly in bulk. Consider comparing prices at different locations to get the best deal.

    Commonly Asked Questions

    Q: Can I use recycled or reclaimed lumber?

    A: You can, but be sure it's suitable for structural use. Inspect it carefully for rot, damage, or pests. Reclaimed lumber might require additional treatment.

    Q: How much will all this cost?

    A: The cost varies dramatically depending on your choices for materials (lumber grade, roofing type, etc.). Expect to spend several hundred dollars, at least. A detailed materials list is essential for accurate budgeting.

    Q: What tools will I need?

    A: That's a whole other article! But at minimum, you'll need measuring tapes, a saw (circular saw or hand saw), a hammer, a level, and possibly a drill.

    Q: How long will it take to gather all the materials?

    A: This depends on your planning and access to stores. Allow a few days, and even a week or longer if you are sourcing materials from multiple locations.

    Building your shed is a project that takes time and planning, but the sense of accomplishment will be worth it. Take your time, plan meticulously, and you’ll be enjoying your new shed in no time!

    Durable 8x6 Wood Shed Plans for Year-Round Outdoor Storage

    Durable 8x6 Wood Shed Plans for Year-Round Outdoor Storage

    Build Your Dream: Durable 8x6 Wood Shed Plans for Year-Round Outdoor Storage

    Tired of cluttered garages and overflowing storage spaces? Dreaming of a dedicated area to house your outdoor equipment, gardening supplies, or seasonal decorations? Then building your own 8x6 wood shed is the perfect solution. This guide provides comprehensive plans for a durable structure designed to withstand the elements and provide reliable year-round storage. We'll walk you through the design, materials, and construction process, empowering you to build a shed you'll be proud of.

    Planning Your 8x6 Wood Shed

    Before you grab your tools, careful planning ensures a successful build. Consider your specific needs. What will you store in the shed? This dictates the internal layout and features. For example, you might need shelving for smaller items or dedicated space for larger equipment like lawnmowers. Next, assess your location. Choose a level, well-drained area with easy access. Check local building codes and obtain any necessary permits. Finally, sketch a detailed plan. This plan will serve as your roadmap throughout the construction process. Include dimensions, material lists, and a step-by-step construction sequence.

    Essential Design Considerations

    Consider these key design elements for your 8x6 wood shed:

    • Foundation: A concrete slab offers the best durability, but gravel or pressure-treated lumber can work as well. Ensure your chosen foundation is level and strong enough to support the weight of the shed.
    • Framing: Use pressure-treated lumber for the foundation and floor framing to resist rot and insect damage. Consider using 4x4 posts for corner supports for added strength and stability.
    • Walls: Opt for tongue-and-groove boards for a tight, weather-resistant wall system. Remember to incorporate proper ventilation to prevent moisture buildup.
    • Roof: A gable roof provides excellent water runoff, and is easier to build than a more complex design. Use quality roofing felt under the chosen roofing material (shingles, metal, etc.) to ensure waterproofing.
    • Door: A single door is sufficient for an 8x6 shed. Consider a strong, weatherproof door with a secure latch.

    Gathering Your Materials

    Creating a detailed materials list is crucial for a smooth and efficient building process. This prevents mid-project runs to the hardware store. Your list should include:

    • Lumber: Pressure-treated lumber for the foundation, floor joists, and wall framing. Untreated lumber for the walls, roof, and interior finishing. Specify the dimensions and quantity needed for each piece.
    • Fasteners: Galvanized nails, screws, and bolts for all aspects of construction. Consider using exterior-grade screws for added durability.
    • Roofing Materials: Asphalt shingles, metal roofing, or other suitable options. Ensure you have sufficient material to cover the roof completely.
    • Sheathing: Plywood or OSB (oriented strand board) to cover the walls and roof before applying the siding and roofing.
    • Siding: Choose a durable and weather-resistant siding material for the shed's exterior.
    • Door and Hardware: A pre-hung door or the materials to construct one. Include hinges, a handle, and a lock.
    • Other essentials: Concrete (if using a concrete slab foundation), roofing felt, sealant, paint or stain.

    Step-by-Step Construction

    With your materials gathered and your plan finalized, it's time to build! Begin by preparing the foundation. Then, construct the floor frame and install the flooring. Erect the walls, ensuring they are plumb and square. Next, raise and secure the roof trusses or rafters. Install the sheathing, roofing felt, and roofing material. Finally, hang the door, add siding, and finish any interior work, like shelving or painting. Remember to work safely, always using appropriate safety gear.

    Maintaining Your New Shed

    Regular maintenance extends the life of your investment. Inspect the shed seasonally, checking for loose nails, damaged siding, or signs of water damage. Apply a fresh coat of paint or stain every few years to protect the wood from the elements. Keep the interior clean and dry to prevent moisture buildup and pest infestations. By following these maintenance tips, you'll enjoy years of reliable service from your new 8x6 wood shed.

    Step-by-Step 6x8 Shed Roof Plans for Beginners

    Step-by-Step 6x8 Shed Roof Plans for Beginners

    Building Your Dream 6x8 Shed: A Beginner's Guide to Shed Roof Construction

    Hey there, future shed-builder! So you're ready to tackle your first building project â€" a 6x8 shed with a simple shed roof. That’s awesome! This guide is designed to walk you through the process, step-by-step, in a way that even a complete beginner can understand. We'll keep it conversational and friendly, because building should be fun, not frustrating!

    Planning and Preparation: Laying the Foundation for Success

    Before you even think about grabbing a hammer, let's get organized. This is the most crucial part, believe it or not. A little planning up front saves you a lot of headaches later.

    Choosing Your Location:

    Where will your magnificent shed reside? Consider factors like sunlight (for ventilation and potential solar panels!), proximity to your house (for easy access), and any local regulations about shed placement. You'll want level ground, ideally, but we can work around minor imperfections. Measure your chosen spot carefully â€" you’ll need this information later.

    Gathering Your Materials:

    This is where a detailed list comes in handy. Don’t just wing it! Here’s a basic list â€" you might need slight adjustments depending on your specific design and local lumber availability:

    • Pressure-treated 4x4 posts for the base (consider the ground conditions; you might need more or longer posts for unstable soil)
    • Pressure-treated 2x4s for the frame
    • Pressure-treated 2x6s for the rafters (we'll go over rafter calculations shortly)
    • Plywood or OSB for the sheathing (roof and walls)
    • Roofing material (shingles, metal, etc.)
    • Nails and screws (various sizes)
    • Level, measuring tape, saw (circular saw is easiest), hammer, drill, safety glasses, work gloves
    • Optional: Construction adhesive for extra strength and weatherproofing

    Pro Tip: Always buy a little extra lumber. You’ll inevitably make mistakes or need extra pieces for adjustments. Better to have some leftover than to run short mid-project!

    Understanding Your Shed Roof Design:

    A shed roof, also called a lean-to roof, is one of the simplest roof designs. It's basically a single sloping plane. For a 6x8 shed, you'll have a longer side (8 feet) forming the lower edge and a shorter side (6 feet) forming the peak. This makes it easy to work with and relatively inexpensive to build.

    Building the Base and Frame: The Shed's Solid Foundation

    Now for the fun part â€" actually building! We'll start with the foundation. This could be anything from a simple concrete slab to a wooden base. For our beginner project, a simple wooden base is perfect.

    Constructing the Base Frame:

    This involves setting your 4x4 posts into the ground. If you have particularly soft soil, you might want to dig holes and fill them with concrete to secure the posts. Make sure they're level with each other, using your level to check constantly. The posts should form a rectangle, 6 feet by 8 feet, to match your shed dimensions.

    Building the Wall Frame:

    Once the base is solid, you can start constructing the wall frame using 2x4s. These will be the vertical supports for your walls. Remember to square your frame frequently to ensure accuracy. Secure everything with nails or screws. You'll likely need corner bracing to add extra stability.

    Constructing the Shed Roof: Raising the Roof!

    This is where things get a little more involved, but don’t worry; we’ll break it down.

    Calculating Rafter Length and Spacing:

    This is crucial. You'll need to determine the appropriate length for your rafters and how far apart to space them. A common spacing is 16 inches on center (meaning the center of each rafter is 16 inches from the center of the next). Use the Pythagorean theorem (a² + b² = c²) to calculate the rafter length. 'A' will be half the width of the shed (3 feet), and 'b' will be the height you want your roof peak to be (let's say 2 feet for now â€" adjust based on your preferences). 'C' will be your rafter length.

    Important Note: This is a simplified calculation. In reality, you’ll need to factor in overhang, which adds extra length to your rafters to create the eave. Consult a building guide or calculator specifically designed for rafter calculations if you’re unsure.

    Cutting and Attaching the Rafters:

    Once you’ve calculated the rafter lengths, carefully cut the 2x6s to the correct size. Use a sawhorse to support them while cutting to ensure accuracy and prevent injury. Attach the rafters to the top of the wall frame, ensuring they're evenly spaced and properly aligned.

    Sheathing the Roof:

    Now you’ll cover the rafters with plywood or OSB sheathing. This creates a solid surface for your roofing material. Make sure the sheathing is properly nailed or screwed to the rafters to prevent leaks.

    Roofing and Finishing Touches: The Home Stretch!

    You're almost there! The final steps are relatively straightforward.

    Installing Roofing Material:

    This step depends on the roofing material you chose. Follow the manufacturer's instructions carefully for the best results. Make sure to properly seal any edges and overlaps to prevent leaks.

    Adding Finishing Touches:

    This is where you can personalize your shed. You might add doors, windows, paint, or even trim to add a personal touch.

    Commonly Asked Questions

    Q: Do I need a building permit?

    A: It depends on your local regulations. Check with your local authorities before you start building.

    Q: What kind of nails or screws should I use?

    A: Galvanized nails or screws are best for outdoor projects as they resist rust.

    Q: Can I build this shed alone?

    A: While possible, having a helper makes the job much easier, especially when lifting and positioning the rafters.

    Q: How long does this project take?

    A: It can vary depending on your experience and the weather, but expect to spend several weekends (at minimum) on this project.

    Q: What if I mess up?

    A: Don't worry! Everyone makes mistakes. Take your time, measure twice, cut once and if something does go wrong, there is always a way to fix it.

    Building your own shed is a rewarding experience. Remember to take your time, be patient, and most importantly, have fun! Good luck and happy building!

    How to Build an 8x12 Storage Shed for Storing Tools, Bikes, and More

    How to Build an 8x12 Storage Shed for Storing Tools, Bikes, and More

    Building Your Dream 8x12 Storage Shed: A Step-by-Step Guide

    So, you're thinking about building an 8x12 storage shed? Fantastic! That's a great size for storing all those tools, bikes, garden supplies, and whatever else is currently cluttering your garage or overflowing from the attic. This guide will walk you through the entire process, from planning to finishing touches, in a way that’s easy to understand, even if you're a complete beginner. Let's get started!

    Phase 1: Planning and Preparation

    Before you even think about picking up a hammer, thorough planning is crucial. This will save you headaches (and potentially money) down the line.

    1.1 Choosing Your Location

    Where will your shed live? Consider:

    • Accessibility: Will you need a driveway or path leading to it?
    • Sunlight: Do you want it sunny or shady? (Consider ventilation if it's going to be sunny).
    • Drainage: Avoid low-lying areas prone to flooding.
    • Local Regulations: Check with your local council or homeowner's association about building permits, setbacks (how far from property lines you can build), and any other restrictions.

    1.2 Design and Materials

    Now for the fun part â€" designing your shed! An 8x12 gives you a decent amount of space, but think about what you'll be storing.

    • Floor Plan: Sketch out a simple floor plan. Will you need shelves? Workbenches? Specific areas for certain items?
    • Materials: Common choices include pressure-treated lumber for the framing, plywood for the walls and roof, and asphalt shingles for the roof. Consider your budget and the climate â€" you might want thicker materials if you live in an area with harsh winters or strong winds.
    • Doors and Windows: Plan for at least one door (a double door is helpful for larger items), and consider adding windows for light and ventilation.

    Don't forget to create a detailed materials list. It's better to have too much than not enough!

    1.3 Obtaining Permits (If Necessary)

    Check your local building codes and regulations. Many areas require permits for structures like sheds. This might involve submitting your plans and potentially paying a fee. Getting a permit before starting ensures you're complying with all local laws and avoids potential fines later.

    Phase 2: Building the Foundation

    A solid foundation is essential for a long-lasting shed. There are several options:

    2.1 Concrete Slab

    This is the most durable option but also the most expensive and labor-intensive. You'll need to excavate, pour concrete, and allow it to cure for several days.

    2.2 Gravel Base

    A more affordable alternative is a gravel base. You'll need to level the ground, lay down a layer of gravel, compact it, and then add a layer of landscaping fabric to prevent weeds from growing through. This is a good choice for areas with well-drained soil.

    2.3 Pier and Beam Foundation

    This involves setting concrete piers in the ground and then building a frame on top of them. This allows for better drainage and is suitable for uneven terrain.

    Whichever foundation you choose, ensure it’s level and strong enough to support the weight of your shed.

    Phase 3: Framing the Shed

    This is where the structure takes shape. You’ll be building the walls and roof frame.

    3.1 Building the Walls

    Follow your plans carefully, cutting and assembling the wall frames. Use appropriate fasteners (nails or screws) and ensure everything is square and plumb (vertical and level). Remember to incorporate openings for doors and windows.

    3.2 Constructing the Roof Frame

    The roof frame can be either a simple gable roof (two sloping sides) or a more complex style. Again, accuracy is key here. Use a level and square to ensure the rafters are properly aligned.

    Phase 4: Sheathing, Roofing, and Siding

    Now it's time to cover your shed's bones with protective layers.

    4.1 Applying Sheathing

    Sheathing (typically plywood) is nailed to the exterior of the wall and roof frames to provide a solid surface for the siding and roofing materials. This also strengthens the overall structure.

    4.2 Installing the Roofing

    Install your chosen roofing material (asphalt shingles are a popular choice). Follow the manufacturer's instructions carefully. Proper installation is essential to prevent leaks.

    4.3 Adding Siding

    Siding protects the walls from the elements and adds to the shed’s aesthetic appeal. Vinyl, wood, or metal siding are common options. Choose one that suits your budget and style preferences.

    Phase 5: Finishing Touches

    The finishing touches transform your basic structure into a functional and attractive storage shed.

    5.1 Installing Doors and Windows

    Carefully install your doors and windows, ensuring they are properly sealed to prevent drafts and leaks. This is often easier with a helper.

    5.2 Adding Interior Features

    Install shelves, workbenches, or any other interior features you planned. Consider adding lighting for better visibility.

    Phase 6: Cleaning Up and Finishing

    Once your shed is complete, it's time to clean up the construction debris. Remember to dispose of all waste responsibly. You might choose to paint or stain your shed for extra protection and aesthetics.

    Frequently Asked Questions

    Q: How long does it take to build an 8x12 shed?

    A: The timeframe varies greatly depending on your experience and the complexity of your design. Expect it to take anywhere from a weekend to several weeks, especially if you are a beginner.

    Q: How much does it cost to build an 8x12 shed?

    A: Costs vary depending on materials, labor (if you hire help), and the complexity of the design. Expect to spend anywhere from a few hundred to several thousand dollars.

    Q: Do I need any special tools?

    A: You'll need basic carpentry tools like a hammer, saw, level, measuring tape, drill, and various fasteners. Consider renting more specialized tools if needed.

    Q: Can I build a shed without any experience?

    A: Yes, but it's important to carefully follow plans, take your time, and don't be afraid to ask for help if you get stuck. There are many online resources and tutorials available to guide you through the process.

    Q: What about weatherproofing?

    A: Proper weatherproofing is essential. Use quality materials and seal all joints and gaps to prevent water damage.

    Building a shed is a rewarding experience. With careful planning, diligent work, and a little patience, you can create a valuable addition to your property that will serve you for years to come. Good luck!